


Monitoring the new unit registration information provided by R.L. Poke has revealed that over the past few years Harley-Davidson® has dominated the motorcycle sales industry in the U.S, on numerous occasions holding ten of the top ten new model sales in various regions of the country. Their FL touring models, in particular including their Electra Glide®, Street Glide™ and Road King®, lead the way in sales. With that being said, for this article we will focus on those models. Some of the information provided can also be applied to Softail and Dyna models, but not all will be relevant.
Harley Davidsons have been around since 1903 and over the years their engine styles have changed very little. They basically have three different lower end configurations. A single cam which covers some of the Pan, Knuckle, Shovel and Evo engines, the four cam which is found in the Sportster engines, and the Twin Cam engine which is probably the most popular engine today. The Twin Cam can be found in the Softail, Dyna and touring models, which were manufactured starting in 1999 and have only seen a few changes. Some changes were made for reliability issues, like the new cam chain tensioners that began in the 2006 Dyna models. Others actually involved cubic inch changes.
In 1999, Twin Cams began life as an 88” engine which made about 65 rear wheel horsepower. Then in 2007, they bumped the FL models up eight cubic inches to make them a 96 cubic inch engine. Harley also threw in a couple special edition engines like the 103 or the 110 found in Harley’s CVO (Custom Vehicle Operations) bikes. However, one problem remained - the lack of horsepower as the 96” only improved the performance by a mere three horsepower. That’s right, 68 rear wheel horsepower from a 96 inch engine. That’s .70 horsepower per cubic inch.
This deficiency opens the door for performance shops to increase their bottom line as you can take a stock 88” and punch it out to 95 cubic inches resulting in over 100 horsepower with additional upgrades to be mentioned later. You can also take the 96” engine and beef it up to a 103 or 107 inch engine resulting in anywhere between 105 and 115 horsepower. Although Harley offers some of these same upgrade kits in their Screamin” Eagle line, they do not maximize the engine’s potential.
Let’s start the process to unleash the horsepower in these engines, which is really what you want to know, right! Keep in mind, you can offer these upgrades as a drive-in, drive-out package with less than a one-week turnaround time.
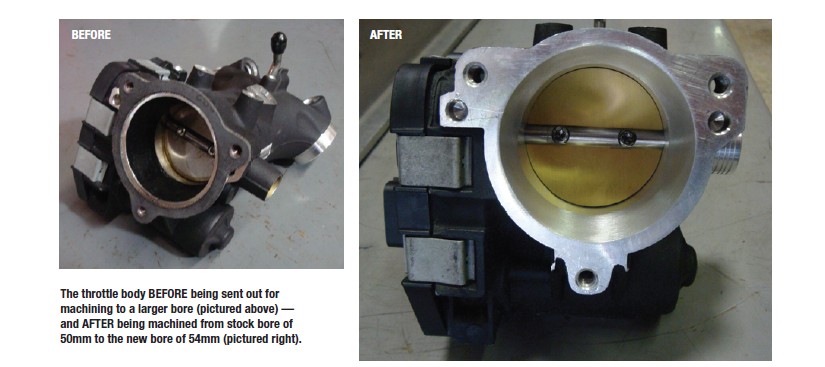
To begin our upgrade, first roll the bike onto the dyno for a baseline power pull to give the customer a before and after power run to show him how much of a gain he is receiving. Immediately after the bike has cooled from the dyno run, start the disassembly process. For this particular upgrade, we are taking a 2009 Road King, which already has aftermarket pipes installed and turn it into a 107 kit. Remove the seat and tank to better access the engine. On the 107 kit the throttle body needs to be bored out. This has to be shipped to an outside source for boring so send it off as soon as possible. The stock bore on a throttle body is 50mm and it will be bored out to 54mm’s. The throttle body seems to be the main restriction when you get above the 95 cubic inch mark.

Next disassemble the rocker boxes, cylinder heads, cylinders and pistons which can be removed with the engine still in the bike. The parts are then delivered to their respective specialist in the shop.
While the engine builder is waiting on the heads and cylinders, he removes the cam cover to access the cam support plate, which holds the stock cams. Stock cams are .484 lift and are replaced with a .598 lift aftermarket cam which provides a broad power curve and produces excellent results for a big bike.
Cam installation is a somewhat simple process on a Twin Cam. Each cam gear is marked with dots which have to be aligned with each other. When going to larger cams, it’s always a good idea to stick the cams in their cases by hand and turn (see photo). Larger lift cams may require clearancing. If your cases need to be clearanced, just stuff some rags in the cam chest cavity and carefully grind enough clearance for the cam lobe to pass freely.
With the engine being a 2009 model, it already has the improved cam chain tensioner setup HD implemented on the 2006 Dyna’s and 2007 model FL’s. The new tensioners are hydraulic and get their pressure from oil in the cam support plate.
Lastly on the cam chest is the alignment of the oil pump. Special screws are available that allow you to properly install the oil pump to the cam support plate.
When the cover is put back on the cam chest, you can now bleed the lifters. This is an optional step as you can also assemble the engine with the lifters in their “pumped up” state. To assemble the engine with lifters that have been bled down, put the engine at TDC on compression stroke and screw the pushrod out until it makes contact with the rocker and just touches the lifter. Then continue screwing the pushrod out for about three revolutions or 18 flats. This ends up being about half the distance of the full travel of a lifter. If you choose not to bleed down the lifters you basically do the same procedure, but you must wait for the lifters on one cylinder to bleed down from the pressure before rotating the engine. This is easy to see by watching the valves through the intake and exhaust port.
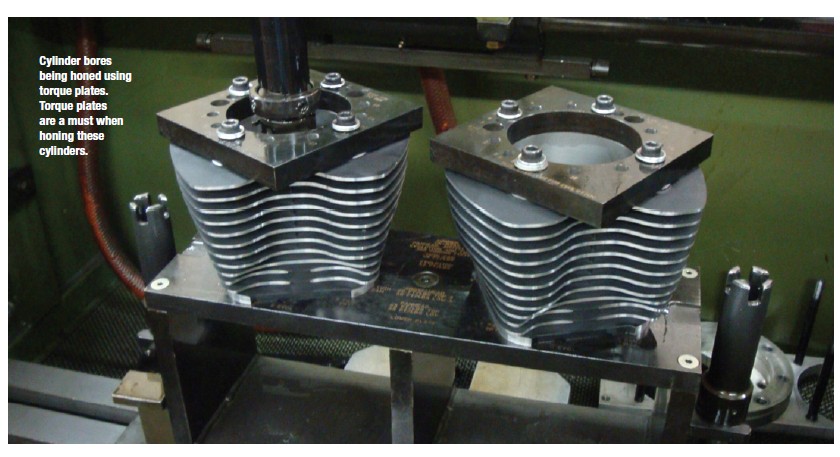
By this time, the cylinders should be bored and honed with torque plates. There’s no room for error on a 107 kit as the cylinder walls get pretty thin at the bottom. Most shops have a minimum of .080 wall thickness, which you will be just under. Because the factory sleeve is thicker farther up into the cylinder, you only have about one inch sticking out which is thin. Stock bore is 3.750 and to get to 107 inches you must bore out .187 for a piston size of 3.937.
After the cylinders have been bored and honed and before we prep the pistons, you must check the deck. You should try to run .040 to .045 piston-to-head. Multilayered steel head gaskets have finally made it to the V-Twin market and several selections are available such as a .030, .040, .045, or .051. If necessary, you can always machine a little off the bottom of the cylinder to dial in the deck.
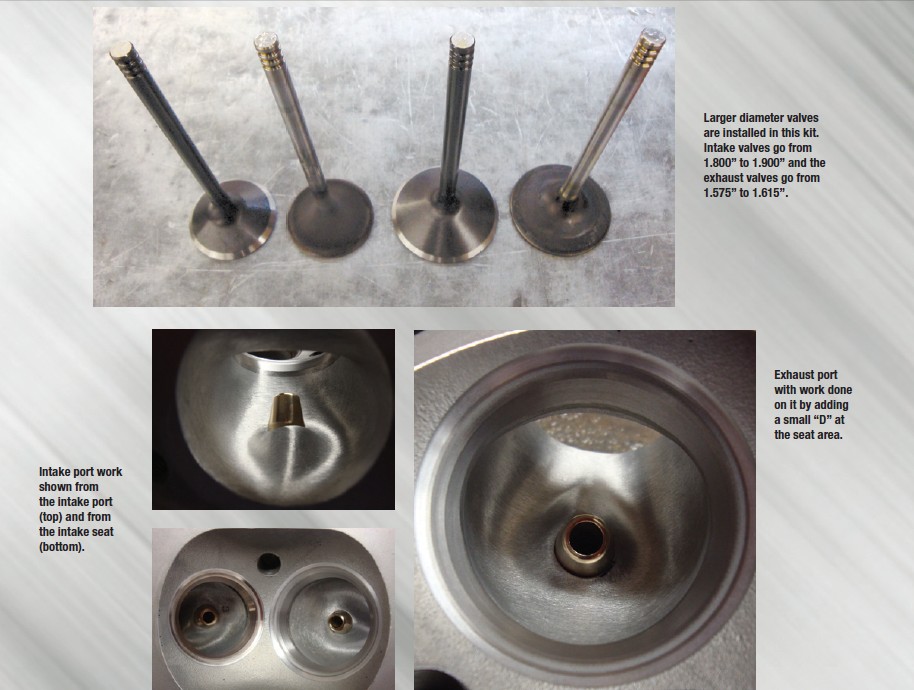
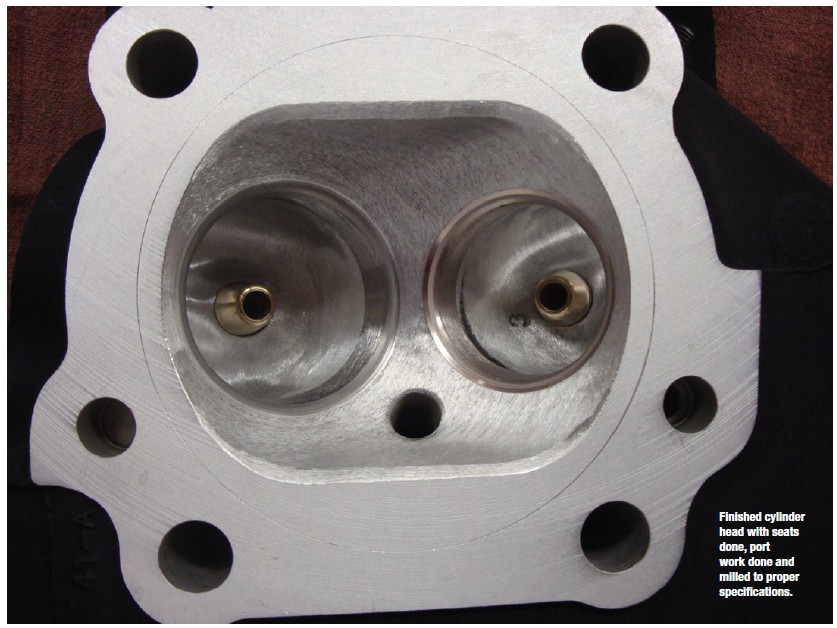
By this time, the heads should be near completion. Stock HD heads come with1.800 intake valves and1.575 exhaust valves. These are replaced with a 1.900 intake and 1.615 exhaust which cut in on a stock seat with no issues. On the intake valve we grind a .045° seat angle with a 39° back angle. The seat angles are as follows: 35° top cut, 45° seat and a 55° bottom cut.
The most important step to improving the heads is the portwork. The majority of the portwork is concentrated on the intake side. Pay lots of attention to the seat area as you would like to have a generous radius off the seat. This will help improve air flow which was one of the downfalls of the stock cylinder heads. The exhaust side portwork is pretty simple. Just add a small “D” shape at the seat area and sand roll the rest of the port as H-D made the exhaust port a little too big from the casting.
When cutting in the valve job for larger cams, you will need a Trock tool (see photo) to set the correct seat depth for valve-to-valve clearance which is provided with whatever camshaft kit you choose. You can even go above .700 lift, but as you know there is always a trade off on reliability. Just as an FYI, if you plan on going above .600 lift, we recommend going to a roller rocker. Stock rocker ratio is 1.625 and aftermarket rockers are available in various ratios up to a 1.725 if you want to cheat the cam a little.
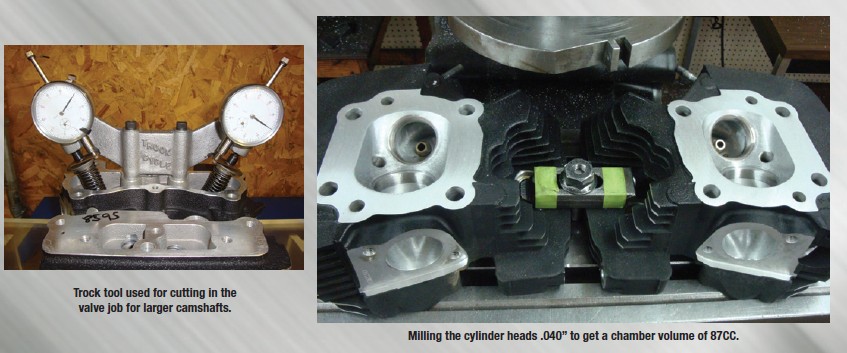
The next step on the heads would be to mill .040 off the deck to get a chamber volume of 87cc, which will yield a compression ratio just over 10:1 with a plus 3cc domed piston. You can experiment with this compression ratio, but keep it under 11:1 for a street Harley as starting can become an issue if you do not have compression releases installed. This would also be a good time to scribe the cylinder bore to the head to check piston fit and valve pocket clearance.
Before finishing up the heads, you have a few more steps. You need to change the factory valve springs to a high performance spring kit that includes titanium retainers to accommodate the bigger lift cam. Seat pressure is set around 180 pounds at a 2.000 installed height. The cast iron guides are also replaced with bronze alloy guides which are honed to size.
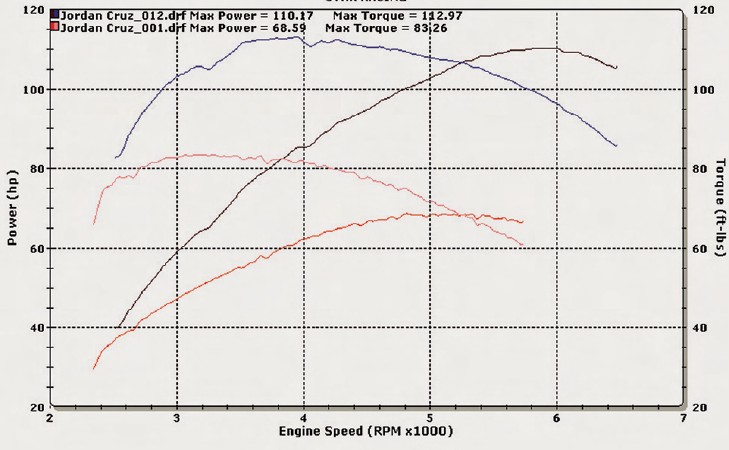
Cylinders, heads and rocker boxes are usually installed in reverse order of disassembly. With the later model fuel injected bikes, you have to add an aftermarket tuner to be able to build a custom map for all the above upgrades. So now it is time to crank up your laptop and begin to dyno the bike to build a map for driveability. When completed you should have a dyno chart that looks very similar to the one in the photo. As the engine breaks in, the horsepower will increase and vary depending upon exhaust systems. This particular bike has true duals which do not make as much horsepower as a 2 into 1 but look really good on the touring bikes. Never argue with the customer over pipes. Always let them pick what they think look and sound the best regardless of a few horsepower.
For anyone in business, always remember the old adage, the customer is always right, but he will be more than elated when he twists the throttle as this engine almost doubles its horsepower.

Derek churchwell is the Co-Owner of DC V-Twin Performance in Perry, Georgia and the engine builder for Four NHRA Pro Stock Bike National Championships, for more information on S&S Engines or Harley Davidson Upgrades call 478-988-4313, email
(478) 988-4313